

Boyfriend Pajamas
Turn a man's shirt into comfy, onesie pajamas or a simple, feminine nightshirt.
In this time of boyfriend jeans, boyfriend watches, and menswear inspired ladies apparel, I thought why not boyfriend's pajamas? There's nothing more comfortable and comforting than your husband or boyfriend's shirts to sleep in, but they're often times so much bigger than we are, and if you're short like me they just look frumpy. That's how I came up with this idea. I was trying to find a way to make them look cute.


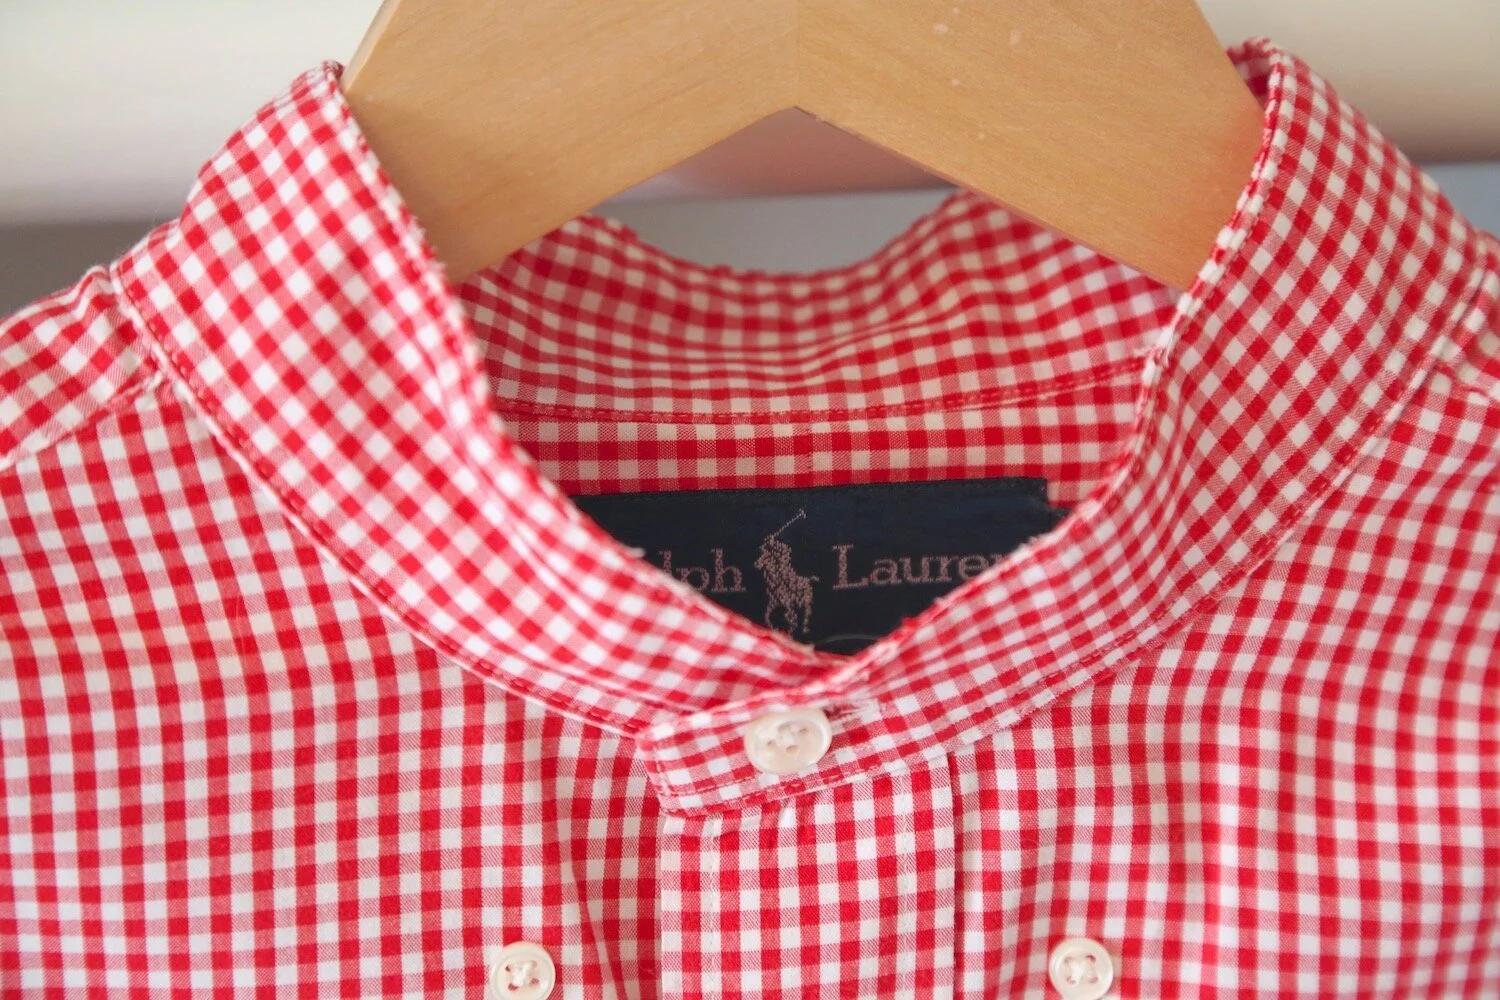
I cut the collar off this shirt and added bias tape and decorative trim to finish off the raw edges. Handmade doilies added some much need color while covering up sewing flaws.
A cuff that was cut off when I shortened the sleeves worked perfectly to cinch the back. Gathering the fabric loosely first (#5 photo below) and stitching a channel to insert a ribbon after stitching the entire way around the cuff gives the back a feminine touch. Adding the ribbon allows you to adjust the gather to customize the comfort. I added a bead on the ends of the ribbon for more shabby chic femininity.
I used the fabric that I removed from the sleeves to make the crotch. See photos #1 & #7 below.
Lace and a gathered ruffle were sewn on the entire way around each leg. The ruffle helps to define the seat and gives this onesie its cute factor.
The sleeve plackets were cut off and sewn on the yoke over each shoulder leaving the side closest to the sleeve open. I stitched down the center of the sleeve placket starting at the shoulder, the flat end, and ending 1/2 inch from the other side, the triangular end. See #3 & #4 photos below.
Details Listed Below
I cut the sleeves off just above the sleeve placket. One of the cuffs was used to gather the back (#6), the sleeve plackets were used to gather the shoulders, and the remaining fabric was used to make the crotch (#7).
I cut the collar base and collar leaf off, gently rounded the neckline by cutting a bit more fabric off, taking care not to cut off the top button and button hole, and sewing on bias and decorative trim to cover the raw edges.
I removed the sleeve plackets from the cuffs and stitched them over the shoulders on the yoke. Don't stitch the side closest to the sleeve. That is where you will thread the ribbon in that allows you to gather the shoulder, giving the pajamas a woman's proportions. To do this, add a stitch down the center of the sleeve placket, starting at the shoulder (flat end) and ending 1/2" from the pointed end closest to the neckline. Use a small safety pin attached to one end of the ribbon to thread the ribbon in one side of the sleeve placket, and return back to the shoulder through the other side. Stopping the middle seam 1/2" from the pointed end gives you the space needed within the seam to turn the safety pin around and feed the ribbon back through the other side.
The sleeve plackets are cut from the cuffs taking care not to cut their finished edges. The only exception is the short flat end were they connect with the cuff. You'll want to maintain the finished edge on the cuff since you'll be using it on the back of the pajamas. I cut the sleeve placket off just above the cuff, so I did have to hem that small edge before I stitched it on the yoke.
If you are working with heavier fabrics you may need to gather the back at the waist loosely first before stitching on the cuff, or collar, depending on which type of nightshirt you are making.
A cuff that was cut off when I shortened the sleeves worked perfectly to cinch the back. Gathering the fabric loosely first (#5 photo below) and stitching a channel to insert a ribbon after stitching the entire way around the cuff gives the back a feminine touch. Adding the ribbon allows you to adjust the gather to customize the comfort. I added a bead on the ends of the ribbon for more shabby chic femininity.
The crotch of the onesie was cut from the fabric left over when the sleeves were cut off just above the placket. Make sure you cut the cuff and sleeve plackets out before you cut the crotch. I used a bathing suit bottom for a pattern. Since there's very little fabric left, you won't have enough fabric to hem the edges. That's why I used bias tape on the edges. The back side of the crotch gets sewn to the inside hem at the bottom of the shirt. At this point, try the shirt on and pin the front edge of the crotch to the front placket were comfortable. Sit down and move around to make sure it's comfortable. It took a few adjustments before i got it right. Turn under the raw edge and stitch. The stitch will be visible so use a color of thread that will blend in with the shirt.


I went for a different look with this shirt. Instead of cutting the entire collar off, I left the collar base attached, removed the collar leaf and used the collar leaf to gather the back. The shirt was made from lighter weight fabric that draped nicely, so it wasn't necessary to gather the fabric first before sewing the collar leaf on the back at the waist. I merely stitched the collar leaf on flat, stitching around the perimeter, then stitched two seams, 1/4 inch apart, down the center to thread the ribbon into. I threaded it with ribbon I made from vintage, calico, bias tape.

